The documentation set for this product strives to use bias-free language. For the purposes of this documentation set, bias-free is defined as language that does not imply discrimination based on age, disability, gender, racial identity, ethnic identity, sexual orientation, socioeconomic status, and intersectionality. Exceptions may be present in the documentation due to language that is hardcoded in the user interfaces of the product software, language used based on RFP documentation, or language that is used by a referenced third-party product. Learn more about how Cisco is using Inclusive Language.
This document describes how to configure and troubleshoot the VPN Phone feature of Cisco IP Phones and Cisco Unified Communications Manager.
Cisco recommends that you have knowledge of these topics:
The information in this document was created from the devices in a specific lab environment. All of the devices used in this document started with a cleared (default) configuration. If your network is live, ensure that you understand the potential impact of any command.
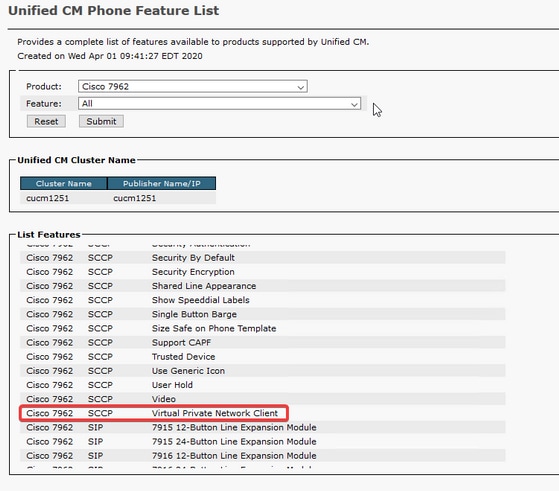
The test environment in this article includes an 8861, ASAv, and CUCM 11.5.1, but there are many different variations of these products that you could use. You must check the Phone Feature List on CUCM to ensure that your phone model supports the VPN feature. In order to use the phone feature list, access your CUCM publisher in your browser and navigate to Cisco Unified Reporting > Unified CM Phone Feature List. Generate a new report and then select your phone model in the dropdown. Next, you need to search the List Features section for Virtual Private Network Client as shown in the image:

VPN phones require that you have the proper configuration on your ASA and CUCM. You could start with either product first, but this document covers the ASA configuration first.
Step 1. Verify that the ASA is licensed to support AnyConnect for VPN phones. The show version command on the ASA can be used to verify that Anyconnect for Cisco VPN Phone is enabled as shown in this snippet:
[output omitted]
Licensed features for this platform:
Maximum VLANs : 50
Inside Hosts : Unlimited
Failover : Active/Standby
Encryption-DES : Enabled
Encryption-3DES-AES : Enabled
Security Contexts : 0
Carrier : Enabled
AnyConnect Premium Peers : 250
AnyConnect Essentials : Disabled
Other VPN Peers : 250
Total VPN Peers : 250
AnyConnect for Mobile : Enabled
AnyConnect for Cisco VPN Phone : Enabled
Advanced Endpoint Assessment : Enabled
Shared License : Disabled
Total TLS Proxy Sessions : 500
Botnet Traffic Filter : Enabled
Cluster : Disabled
If this feature is not enabled, you need to work with the License team to get the appropriate license. Now that you have confirmed that your ASA supports VPN phones, you can begin the configuration.
Note: All of the underlined items in the configuration section are configurable names that can be changed. Most of these names are referenced elsewhere in the config, so it is important to remember the names you use in these sections (group policy, tunnel group, etc) becase you need them later.
Step 2. Create an IP address pool for VPN clients. This is similar to a DHCP pool in that when an IP phone connects to the ASA it receives an IP address from this pool. The pool can be created with this command on the ASA:
ip local pool vpn-phone-pool 10.10.1.1-10.10.1.254 mask 255.255.255.0
Also, if you prefer a different network or subnet mask, that can be changed as well. Once the pool is created, you need to configure a group policy (a set of parameters for the connection between the ASA and IP phones):
group-policy vpn-phone-policy internal
group-policy vpn-phone-policy attributes
split-tunnel-policy tunnelall
vpn-tunnel-protocol ssl-client
Step 3. You need to enable AnyConnect if it is not already enabled. In order to do this, you need to know the name of the outside interface. Typically, this interface is named outside (as shown in the snippet), but it is configurable, so be sure to confirm you have the right interface. Run show ip to see the list of interfaces:
sckiewer-ASAv# show ip
System IP Addresses:
Interface Name IP address Subnet mask Method
GigabitEthernet0/0 outside 172.16.1.250 255.255.255.0 CONFIG
GigabitEthernet0/1 inside 172.16.100.250 255.255.255.0 CONFIG
Current IP Addresses:
Interface Name IP address Subnet mask Method
GigabitEthernet0/0 outside 172.16.1.250 255.255.255.0 CONFIG
GigabitEthernet0/1 inside 172.16.100.250 255.255.255.0 CONFIG
In this environment, the outside interface is named outside, so these commands enable AnyConnect on that interface.
webvpn
enable outside
anyconnect enable
Step 4. Configure a new tunnel group in order to apply the group policy created earlier to any clients that connect on a specific URL. Notice the reference to the names of the IP address pool and group policy that you created earlier in the 3rd and 4th lines of the snippet. If you modified the names of the IP address pool or group policy, then you need to use replace the incorrect values with your modified names:
tunnel-group vpn-phone-group type remote-access
tunnel-group vpn-phone-group general-attributes
address-pool vpn-phone-pool
default-group-policy vpn-phone-policy
tunnel-group vpn-phone-group webvpn-attributes
authentication certificate
group-url https://asav.sckiewer.lab/phone enable
You can use an IP address rather than a name for the group-url. This is usually done if the phones do not have access to a DNS server that can resolve the Fully Qualified Domain Name (FQDN) of the ASA. Also, you can see that this example uses certificate-based authentication. You have the option to use username/password authentication as well, but there are more requirements on the ASA that are outside of the scope of this document.
In this example, the DNS server has the A record, asav.sckiewer.lab - 172.16.1.250 and you can see from the show ip output that 172.16.1.250 is configured on the interface named outside. So the configuration would be:
crypto ca trustpoint asa-identity-cert
enrollment self
subject-name CN=asav.sckiewer.lab
crypto ca enroll asa-identity-cert
ssl trust-point asa-identity-cert outside
A few things to note:
Step 5. Create the necessary trustpoints to allow the ASA to trust the IP phone's certificate. First, you need to determine if your IP phones use the Manufacturer Installed Certificate (MIC) or Locally Significant Certificate (LSC). By default, all phones use their MIC for secure connections unless an LSC is installed on them. In CUCM 11.5.1 and up, you can run a search located at Unified CM Administration > Device > Phone to see if LSCs are installed while older versions of CUCM would require you physically check the security settings on each phone. In CUCM 11.5.1, notice that you need to add a filter (or change the default filter) to LSC Issued By. Devices with NA in the LSC Issued By column utilize the MIC since they do not have an LSC installed.

If your phone looks like the one highlighted in the image, you need to upload the CUCM Publisher's CAPF certificate to the ASA in order for the ASA to validate the phone's certificate for the secure connection. If you want to use devices with no LSC installed, then you need to upload the Cisco Manufacturing Certificates to the ASA. These certificates can be found on the CUCM Publisher at Cisco Unified OS Administration > Security > Certificate Management:
Note: You can see that some of these certificates in multiple trust-stores (CallManager-trust and CAPF-trust). It does not matter which trust-store you download the certificates from as long as you ensure that you select the ones with these exact names.

Regarding the MIC, older phones models such as the 79xx and 99xx series utilize the SHA-1 certificate chain while newer phone models such as the 88xx series utilize the SHA-256 certificate chain. The certificate chain that your phone(s) use needs to be uploaded to the ASA.
Once you have the required certificates, you can create the trustpoint(s) with:
crypto ca trustpoint cert1
enrollment terminal
crypto ca authenticate cert1
The first command creates a trustpoint named cert1, and the crypto ca authenticate command allows you to paste the base64 encoded certificate into the CLI. You can run these commands as many times as you need to in order to get the appropriate trustpoints on the ASA, but be sure to use a new trustpoint name for each certificate.
Step 6. Acquire a copy of the ASA identity certificate by issuing this command:
crypto ca export asa-identity-cert identity-certificate
This exports the identity certificate for the trustpoint named asa-identity-cert. Be sure to adjust the name so it matches the trustpoint you created in step 4.
Here is the full lab configuration for the ASA:
ip local pool vpn-phone-pool 10.10.1.1-10.10.1.254 mask 255.255.255.0 group-policy vpn-phone-policy internal group-policy vpn-phone-policy attributes split-tunnel-policy tunnelall vpn-tunnel-protocol ssl-client webvpn enable outside anyconnect enable tunnel-group vpn-phone-group type remote-access tunnel-group vpn-phone-group general-attributes address-pool vpn-phone-pool default-group-policy vpn-phone-policy tunnel-group vpn-phone-group webvpn-attributes authentication certificate group-url https://asav.sckiewer.lab/phone enable ssl trust-point asa-identity-cert outside
At this point, the ASA config is complete, and you can proceed with the configuration of CUCM. You need to have a copy of the ASA certificate that you just collected and the URL that was configured in the tunnel-group section.
Step 1. On CUCM, navigate to Cisco Unified OS Administration > Security > Certificate Management and upload the ASA certificate as phone-vpn-trust.
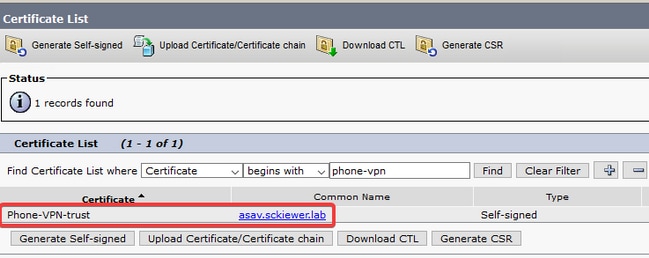
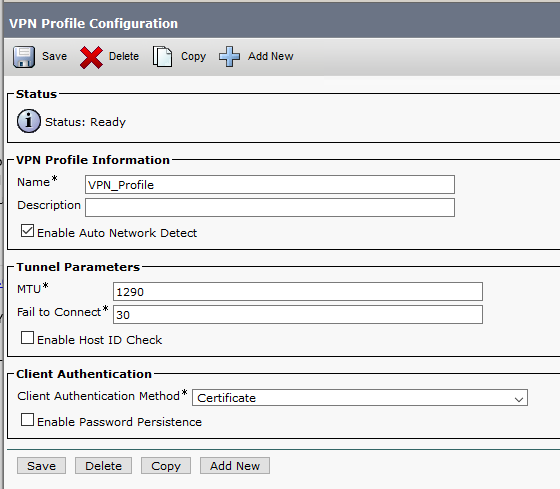
Step 2. Once this is done, navigate to Cisco Unified CM Administration > Advanced Features > VPN > VPN Profile and create a new profile. There is no right or wrong in this section, it is just important to understand the purpose of each setting.
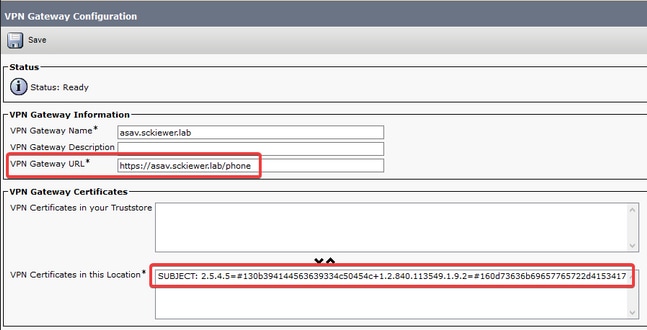
Step 3. Next, navigate to Cisco Unified CM Administration > Advanced Features > VPN > VPN Gateway. You need to ensure that your VPN Gateway URL matches the ASA configuration, and that you move the certificate from the top box to the bottom box as shown in the image:
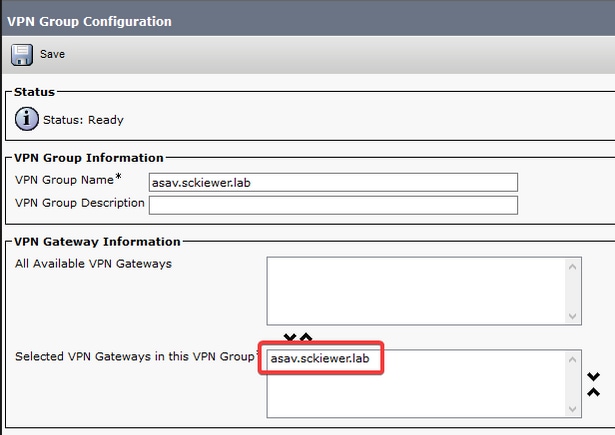
Step 4. Once this is saved, you need to navigate to Cisco Unified CM Administration > Advanced Features > VPN > VPN Group and move the gateway you created to the 'Selected VPN Gateways in this VPN Group' box:
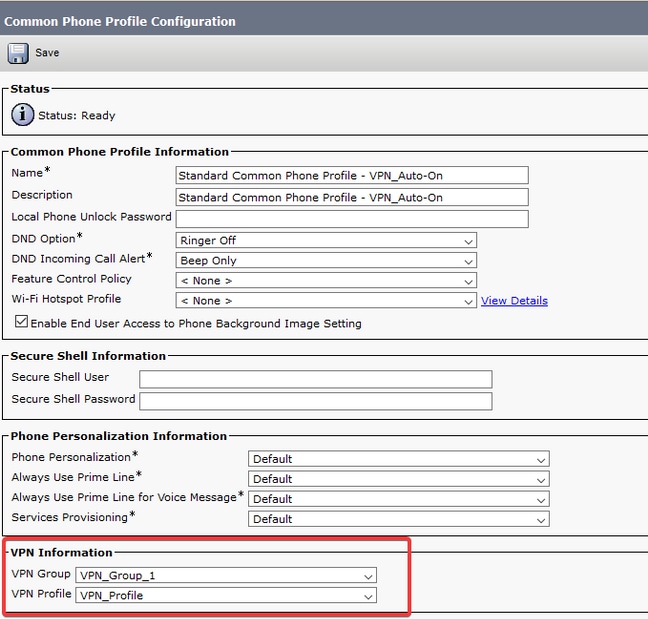
Step 5. Now that the the VPN settings have been configured, you need to navigate to Cisco Unified CM Administration > Device > Device Settings > Common Phone Profile. Here, you must copy the profile that your desired VPN phone uses, rename it, and select your VPN Group and VPN Profile then save the new profile:
Step 6. Finally, you need to apply this new profile to your phone, and then reset the phone while it is on the internal network. This allows the phone to receive all of this new configuration such as the ASA certificate hash, and the VPN URL.
Note: Before testing the phone, you need to ensure that the phones have an 'Alternate TFTP' server configured. Since the ASA does not provide an option 150 to the phones, the TFTP IP needs to be configured on the phones manually.
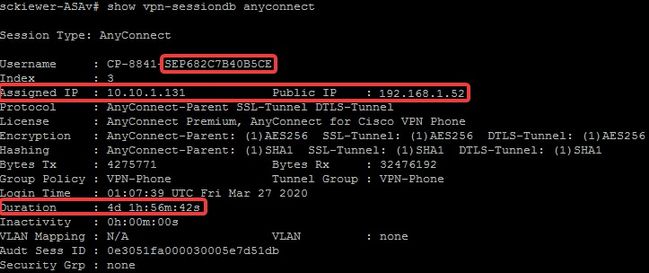
Step 7. Test the VPN phone and verify that it can successfully connect to the ASA and register. You can verify that the tunnel is up on the ASA with, show vpn-sessiondb anyconnect:
In order to troubleshoot a VPN Phone issue, this data is recommended:
Once you have reproduced the issue with the debugs enabled, you can view the output with this command since debug output always contains 711001:
show log | i 711001
Note: For the purposes of this section, log snippets are from an 8861 phone since that is one of the more common phone series deployed as a VPN phone. Bear in mind that other models can write different messages in the logs.
Before the ASA identity certificate expires, a new certificate needs to be generated and pushed out to the phones. In order to do this without an impact the VPN phones, use this process:
Step 1. Create a new trustpoint for the new identity certificate:
crypto ca trustpoint asa-identity-cert-2
enrollment self
subject-name CN=asav.sckiewer.lab
crypto ca enroll asa-identity-cert-2
Step 2. At this point, you would have a new identity certificate for the ASA, but it is not used on any interface yet. You need to export this new certificate and upload it to CUCM:
crypto ca export asa-identity-cert-2 identity-certificate
Step 3. Once you have the new identity certificate, upload it to one of your CUCM nodes as phone-VPN-trust at Cisco Unified OS Administration > Security > Certificate Management > Upload.
Note: The current phone-VPN-trust certificate would only be present on the CUCM node to which it was originally uploaded (it is not automatically propagated out to other nodes like some certificates). If your CUCM version is affected by CSCuo58506, you must upload the new ASA certificate to a different node.
Step 4. Once the new certificate is uploaded to any of the nodes in the cluster, navigate to Cisco Unified CM Administration > Advanced Features > VPN > VPN Gateway on the CUCM Publisher
Step 5. Select the appropriate gateway.
Step 6. Select the certificate in the top box (this is the one you just uploaded) and select the down arrow to move it to the bottom (this allows TFTP to add that certificate into your VPN phone's configuration files) and select Save.
Step 7. Once that has been done, reset all of the VPN phones. At this point in the process, the ASA still presents the old certificate, so the phones can connect, however, they acquire a new configuration file which contains both the new certificate and the old certificate.
Step 8. Now you can apply the new certificate to the ASA. In order to do this, you need the name of the new trustpoint and the name of the outside interface, then run this command with that information:
ssl trust-point asa-identity-cert-2 outside
Note: You can navigate to the webvpn URL in your browser to verify that the ASA presents the new certificate. Since that address has to be publicly reachable for external phones to reach it, your PC is able to reach it as well. You can then check the certificate that the ASA presents to your browser and confirm that it is the new one.
Step 9. Once the ASA is configured to use the new certificate, reset a test phone and verify that it is able to connect to the ASA and register. If the phone successfully registers, you can then reset all of the phones and verify that they are able to connect to the ASA and register. This is the recommended process because the phones that are connected to the ASA remain connected after the certificate change. If you test your certificate update on one phone first, you lower the risk of a configuration issue affect a large number of phones. If the first VPN phone is unable to connect to the ASA, then you can collect logs from the phone and/or ASA to troubleshoot while the other phones remain connected.
Step 10. Once you have verified that the phones are able to connect and register with the new certificate, the old certificate can be removed from CUCM.
ASAs support Elliptic Curve (EC) cryptography in as of 9.4(x), so it is common to see previously working VPN phones fail after an ASA upgrade to 9.4(x) or higher. This occurs because the ASA now selects an EC cipher during the TLS handshake with newer phone models. Typically, there is an RSA certificate associated to the interface to which the phone connects since the previous ASA version did not support EC. At this point, since the ASA has selected an EC cipher, it cannot use an RSA certificate for the connection, so it generates and sends the phone a temporary self-signed certificate that it creates with the EC algorithm rather than RSA. Since this temporary certificate is not recognzied by the phone, the connection fails. You can verify this in the 88xx phone logs is pretty straightforward.
2101 NOT Mar 30 12:23:21.331861 (393:393) VPNC: -protocol_handler: current cipher -> ECDHE-RSA-AES256-GCM-SHA384:ECDHE-RSA-AES128-GCM-SHA256:AES256-SHA:AES128-SHA 2102 NOT Mar 30 12:23:21.331871 (393:393) VPNC: -protocol_handler: new cipher -> ECDHE-RSA-AES256-GCM-SHA384:ECDHE-RSA-AES128-GCM-SHA256:AES256-SHA:AES128-SHA
The phone logs show that the ASA selected an EC cipher for this connection as the 'new cipher' line contains EC ciphers which causes the connection to fail.
In a scenario where AES was selected, you would see this:
2691 NOT Mar 30 12:18:19.016923 (907:907) VPNC: -protocol_handler: current cipher -> ECDHE-RSA-AES256-GCM-SHA384:ECDHE-RSA-AES128-GCM-SHA256:AES256-SHA:AES128-SHA 2690 NOT Mar 30 12:18:19.016943 (907:907) VPNC: -protocol_handler: new cipher -> AES256-SHA:AES128-SHA
More information about this can be found here, CSCuu02848.
The fix for this would be to disable EC ciphers on the ASA for the TLS version that your phone uses. More information about which TLS version each phone model supports can be found here:
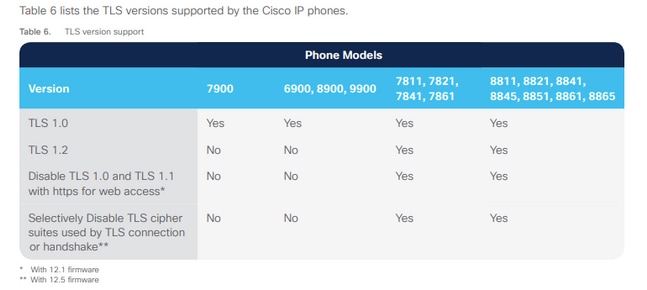
Once you know which TLS versions are relevant in your environment, you can run these commands on the ASA to disable EC ciphers for those versions:
ssl cipher tlsv1 custom "AES256-SHA:AES128-SHA:AES256-GCM-SHA384:AES256-SHA256:AES128-GCM-SHA256:AES128-SHA256:AES256-SHA"
ssl cipher tlsv1.1 custom "AES256-SHA:AES128-SHA:AES256-GCM-SHA384:AES256-SHA256:AES128-GCM-SHA256:AES128-SHA256:AES256-SHA"
ssl cipher tlsv1.2 custom "AES256-SHA:AES128-SHA:AES256-GCM-SHA384:AES256-SHA256:AES128-GCM-SHA256:AES128-SHA256:AES256-SHA" ssl cipher dtlsv1 custom "AES256-SHA:AES128-SHA:AES256-GCM-SHA384:AES256-SHA256:AES128-GCM-SHA256:AES128-SHA256:AES256-SHA"
Bear in mind that IP phones use DTLS (Datagram Transport Layer Security) by default, so you need to run the cipher statement for DTLS and the relevant TLS version for your phones. Also, it's important to understand that these changes are global changes on the ASA, so they prevent EC ciphers from being negotiated by any other AnyConnect client that uses those TLS versions.
In some cases, VPN phones cannot establish a connection to the ASA with DTLS. If the phone tries to use DTLS but it fails, the phone continues to try DTLS over and over, unsuccessfully, because it knows that DTLS is enabled You would see this in the 88xx phone logs:
3249 ERR Mar 29 15:22:38.949354 (385:385) VPNC: -dtls_state_cb: DTLSv0.9: write: alert: fatal:illegal parameter
3250 NOT Mar 29 15:22:38.951428 (385:385) VPNC: -vpnc_set_notify_netsd : cmd: 0x5 event: 0x40000 status: 0x0 error: 0x0
3251 ERR Mar 29 15:22:38.951462 (385:385) VPNC: -alert_err: DTLS write alert: code 47, illegal parameter
3252 ERR Mar 29 15:22:38.951489 (385:385) VPNC: -create_dtls_connection: SSL_connect ret -1, error 1
3253 ERR Mar 29 15:22:38.951506 (385:385) VPNC: -DTLS: SSL_connect: SSL_ERROR_SSL (error 1)
3254 ERR Mar 29 15:22:38.951552 (385:385) VPNC: -DTLS: SSL_connect: error:140920C5:SSL routines:ssl3_get_server_hello:old session cipher not returned
3255 ERR Mar 29 15:22:38.951570 (385:385) VPNC: -create_dtls_connection: DTLS setup failure, cleanup
3256 WRN Mar 29 15:22:38.951591 (385:385) VPNC: -dtls_state_cb: DTLSv0.9: write: alert: warning:close notify
3257 ERR Mar 29 15:22:38.951661 (385:385) VPNC: -do_dtls_connect: create_dtls_connection failed
3258 ERR Mar 29 15:22:38.951722 (385:385) VPNC: -protocol_handler: connect: do_dtls_connect failed
3259 WRN Mar 29 15:22:38.951739 (385:385) VPNC: -protocol_handler: connect : err: SSL success DTLS fail
This can be caused by the same issue mentioned in the ASA Selecting Elliptic Curve (EC) Cipher section, so you must ensure that you have EC ciphers disabled for DTLS. Aside from that, you can disable DTLS altogether which forces VPN phones to use TLS instead. This would not be ideal since it would mean that all traffic would utilize TCP rather than UDP which adds some overhead. However, in some scenarios this is a good test as it at least confirms that the most of the configuration is fine, and the issue is specific to DTLS. If you want to test this, it's best to do it at a group-policy level because administrators typically use a unique group-policy for VPN phones, so this lets us test a change without affecting other clients.
group-policy vpn-phone-policy attributes
webvpn
anyconnect ssl dtls none
Another common configuration issue that can prevent a successful DTLS connection is if the phone cannot establish the TLS and DTLS connection with the same cipher. Example log excerpt:
%%%%% TLS Ciphers Offered
3905 NOT Apr 01 20:14:22.741838 (362:362) VPNC: -protocol_handler: new cipher -> ECDHE-RSA-AES256-GCM-SHA384:ECDHE-RSA-AES128-GCM-SHA256:AES256-SHA:AES128-SHA

%%%%% DTLS Ciphers Offered
4455 NOT Apr 01 20:14:23.405417 (362:362) VPNC: -process_connect: x-dtls-ciphersuite: AES128-SHA
4487 NOT Apr 01 20:14:23.523994 (362:362) VPNC: -create_dtls_connection: cipher list: AES128-SHA

%%%%% DTLS connection failure
4496 WRN Apr 01 20:14:53.547046 (362:474) VPNC: -vpnc_control: conn timer expired at:1585772093, to abort connect
4497 NOT Apr 01 20:14:53.547104 (362:474) VPNC: -abort_connect: in dtls setup phase
You can see the TLS ciphers offered in the first line from the snippet. The most secure option that both sides support is selected (the logs do not show the selection, however, you can deduce that it is at least AES-256 from the log snippet). You can also see that the only DTLS cipher offered is AES128. Since the selected TLS cipher is not available for DTLS, the connection fails. The fix in this scenario would be to ensure that the ASA configuration allows for the same ciphers to be used for TLS and DTLS.
It is very important that you upload the a new ASA identity certificate as phone-vpn-trust on CUCM so that the phones can acquire the hash for this new certificate. If this process is not followed, after the update and the next time a VPN phone tries to connect to the ASA, the phone is presented with a certificate that it does not trust, so the connection fails. This can sometime occur days or weeks after the ASA certificate update because the phones are not disconnected when the certificate changes. As long as the ASA continues to receive keepalives from the phone, the VPN tunnel stays up. So, if you have confirmed that the ASA certificate has been updated, but the new certificate was not put on CUCM first, you have a two options:
In some scenarios, the administrator configures the VPN URL with a hostname rather than IP address. When this is done, the phone needs to have a DNS server to be able to resolve the name to an IP address. In the snippet, you can see that the phone tries to resolve the name with its two DNS servers, 192.168.1.1 and 192.168.1.2, but does not receive a response. After 30 seconds, the phone prints a 'DnsLookupErr:'
3816 NOT Mar 3 15:38:03.819168 VPNC: -do_login: URL -> https://asav.sckiewer.lab/phone
.
3828 INF Mar 3 15:38:03.834915 dnsmasq[322]: query[A] asav.sckiewer.lab from 127.0.0.1
3829 INF Mar 3 15:38:03.835004 dnsmasq[322]: forwarded asav.sckiewer.lab to 192.168.1.1
3830 INF Mar 3 15:38:03.835030 dnsmasq[322]: forwarded asav.sckiewer.lab to 192.168.1.1
3831 INF Mar 3 15:38:17.845305 dnsmasq[322]: query[A] asav.sckiewer.lab from 127.0.0.1
3832 INF Mar 3 15:38:17.845352 dnsmasq[322]: forwarded asav.sckiewer.lab to 192.168.1.1
3833 INF Mar 3 15:38:17.845373 dnsmasq[322]: forwarded asav.sckiewer.lab to 192.168.1.2
3834 INF Mar 3 15:38:31.854834 dnsmasq[322]: query[A] asav.sckiewer.lab from 127.0.0.1
3835 INF Mar 3 15:38:31.854893 dnsmasq[322]: forwarded asav.sckiewer.lab to 192.168.1.1
3836 INF Mar 3 15:38:31.855213 dnsmasq[322]: forwarded asav.sckiewer.lab to 192.168.1.2
3837 ERR Mar 3 15:38:32.864376 VPNC: -parse_url: gethostbyname failed
3838 NOT Mar 3 15:38:32.864435 VPNC: -vpnc_set_notify_netsd : cmd: 0x5 event: 0x40000 status: 0x0 error: 0x0
3839 ERR Mar 3 15:38:32.864464 VPNC: -do_login: parse URL failed -> https://asav.sckiewer.lab/phone
3840 NOT Mar 3 15:38:32.864482 VPNC: -vpn_stop: de-activating vpn
3841 NOT Mar 3 15:38:32.864496 VPNC: -vpn_set_auto: auto -> auto
3842 NOT Mar 3 15:38:32.864509 VPNC: -vpn_set_active: activated -> de-activated
3843 NOT Mar 3 15:38:32.864523 VPNC: -set_login_state: LOGIN: 1 (TRYING) --> 3 (FAILED)
3844 NOT Mar 3 15:38:32.864538 VPNC: -set_login_state: VPNC : 1 (LoggingIn) --> 3 (LoginFailed)
3845 NOT Mar 3 15:38:32.864561 VPNC: -vpnc_send_notify: notify type: 1 [LoginFailed]
3846 NOT Mar 3 15:38:32.864580 VPNC: -vpnc_send_notify: notify code: 32 [DnsLookupErr]
3847 NOT Mar 3 15:38:32.864611 VPNC: -vpnc_send_notify: notify desc: [url hostname lookup err]
This usually indicates one of the following:
In order to fix this issue there are two options:
As mentioned earlier in this document, Auto Network Detect causes the phone to ping the TFTP server and check for a response. If the phone is on the internal network, then the TFTP server is reachable without VPN, so when the phone receives responses to the pings, it does not enable VPN. When the phone is NOT on the internal network, the pings fail, so the phone would then enable VPN and connect to the ASA. Keep in mind that a client's home network is likely not going to be configured to provide the phone with an option 150 via DHCP, and the ASA also cannot provide an option 150, so 'Alternate TFTP' is a requirement for VPN phones.
In the logs, you would want to verify a few things:
It is important to view these items in this order. In a scenario where the phone is pinging the wrong IP and receiving a response, it would be pointless to enable debugs on the ASA because the phone will not enable VPN. Validate these 3 things in this order so that you can prevent unnecessary log analysis. You will see this in the 88xx phone logs if the ping fails and VPN is enabled afterward:
5645 NOT Mar 27 11:32:34.630109 (574:769) JAVA-vpnAutoDetect: ping time out
5647 DEB Mar 27 11:32:34.630776 (710:863) JAVA-configmgr MQThread|cip.vpn.VpnStateHandler:? - VpnStateHandler: handleVPN_ENABLED_STATE()
Verify that the phone has Alternate TFTP enabled and the correct TFTP IP configured. Alternate TFTP is a requirement for VPN phones because the ASA cannot provide an option 150.